How to create a blog application using Flask and Flask Blueprints in Python


INTRODUCTION:
Flask is a web application framework written in Python and is based on the Werkzeg WSGI toolkit and the Jinja2 template engine. Werkzeug is a WSGI toolkit that implements requests, response objects, and utility functions. This enables a web frame to be built on it. The Flask framework uses Werkzeg as one of its bases.
Jinja2 is a popular template engine for Python that combines a template with a specific data source to render a dynamic web page. This allows you to pass Python variables into HTML templates. You can read more about flask here
In this article, I will be writing about how I built a blog application from start to finish using Flask and Flask Blueprints. In this blog application, anyone can view a post from the home page, but a user needs to be logged in to be able to add, edit or delete a post. Even though I will be using HTML and some CSS, this article will concentrate more on the backend details than the front end.
PREREQUISITES:
To begin you need to have the following
Python3 installed on your system
Source-code editor preferably VS Code
Working knowledge of Python
Basic Knowledge of Flask and Flask Blueprint
Setting up the working environment
You first need to create a working directorate for your project. To do this you can navigate to a directorate on your system and create a new directorate using any shell of your choice. I will be using Gitbash for this project.
mkdir project_name
cd project_name
The next step is to create a virtual environment for your project. A virtual environment is used to manage the dependencies for your project, both in development and production. The more Python projects you have, the more likely it is that you need to work with different versions of Python libraries, or even Python itself. Newer versions of libraries for one project can break compatibility in another project. You can read more on the virtual environment here
python3 -m venv environment_name
This should create a new folder in your working directorate with your environment name
You should then activate your virtual environment after the installation as follows:
source environment_name/Scripts/activate #for windows
source environment_name/bin/activate #for macOS/Linux
Setting up the Flask application
After activating our virtual environment, we will now have to install and create our flask application.
To install flask, use the following command in your terminal:
pip install Flask
Note: It is a good practice to always save any package or dependency you install for your application to your requirements.txt file. Rember to do this since we will be installing some additional packages for the application. You can do this in your terminal as follows
pip freeze > requirements.txt
This will create a new file called "requirements.txt" in your working directorate. Any package you install and pip freeze will be save in this file.
Let’s now create a file called run.py in our working directorate. This is where we will create and run our application. In the run.py file add the following lines of code to create the flask application
from flask import Flask

app = Flask(__name__)
app.config["SQLALCHEMY_TRACK_MODIFICATIONS"] = False
Now we have a flask application called app.
We’ll be using python-dotenv to have our environment variables load automatically every time we run the app. This will help avoid setting up the environment variables each time we work on the app. To do this we will have to install python-dotenv using our terminal as follows:
pip install python-dotnev
Now let’s create a file in our working directorate called ".flaskenv". In our .flaskenv file let’s setup our variables as follows:
FLASK_ENV = development
FLASK_DEBUG = 1
FLASK_APP = run
SQLALCHEMY_TRACK_MODIFICATIONS = 0
Now let’s load our .flaskenv from our app by adding some lines of code to the run.py file.
from dotenv import load_dotenv

load_dotenv()
Our run.py file should now look as follows:
from flask import Flask
from dotenv import load_dotenv

load_dotenv()

app = Flask(__name__)
app.config["SQLALCHEMY_TRACK_MODIFICATIONS"] = False
Setting up the database
We’ll be using Flask SQLAlchemy to set up our database. So let's first install Flask-SQLAlchem. Using your terminal type the following to install:
pip install Flask-SQLAlchemy
Next, we'll be using SQLite declarative base database to store our users and posts for this reason we need to set up our database. To do this, let’s create a new folder in our working directorate called "app". Navigate to the "app" folder and create another folder called "main". Now let’s navigate to our “main” folder and create a file called "db.py". We shall add the following lines of codes to our db.py file to create our database instance
from sqlalchemy.orm import scoped_session, sessionmaker
from sqlalchemy.ext.declarative import declarative_base
from sqlalchemy import create_engine

engine = create_engine("sqlite:///blogdatabase.db")

session = scoped_session(sessionmaker(bind=engine))

Base = declarative_base()
Our declarative base is now ready, we can now go ahead and create our database models
Creating database models/tables
In this application, we will be using just two tables namely the user table and the posts table. To achieve this we first need to create models for these tables using the declarative base variable (Base). So in our “main” folder let’s create another folder called models and navigate to it. We’ll then create two files in our “models” folder, namely post.py and user.py. We can now add these lines of code to our user.py file.
m sqlalchemy import Column, Integer, String, DateTime
from flask_login import UserMixin
from app.main.db import Base

class User(Base, UserMixin):
    __tablename__ = 'users'

    id = Column(Integer(), primary_key=True)
    first_name = Column(String(50), nullable=False)
    last_name = Column(String(50), nullable=False)
    display_pic = Column(String(), default='default_photo.jpg')
    background_pic = Column(String(), default='blue_background.jpg')
    username = Column(String(10), unique=True, nullable=False)
    email = Column(String(50), unique=True, nullable=False)
    password_hash = Column(String(500))


    def __repr__(self):
        return f'<User {self.first_name}>'
These are the fields we will need for our users, you can add more fields or reduce them depending on how you wish to build your application
Next, we will create our posts model by adding these lines of codes to our post.py file
from sqlalchemy import Column, ForeignKey, Integer, String, DateTime
from app.main.db import Base
from datetime import datetime

class Post(Base):
    __tablename__ = 'posts'

    id = Column(Integer(), primary_key=True)
    title = Column(String(20), nullable=False)
    content = Column(String(800), nullable=False)
    image = Column(String(), default='default_post_photo.jpg')
    username = Column(String(), ForeignKey('users.username'), nullable=False)
    no_of_views = Column(Integer(), default=0)
    date_added = Column(DateTime(), default=datetime.utcnow)
    date_updated = Column(DateTime(), default=datetime.utcnow)


    def __repr__(self):
        return f'<Title {self.title}>'
Just as with the user model, you can add or delete some of the fields depending on how you want your application to run.
Now that our models are ready, we will need to create our database. To do this, we’ll add the following line of code to our run.py file
from app.main.db import Base, engine

Base.metadata.create_all(bind=engine)
Our run.py file should now look like this:
from flask import Flask
from dotenv import load_dotenv
from app.main.db import Base, engine


load_dotenv()

app = Flask(__name__)
app.config["SQLALCHEMY_TRACK_MODIFICATIONS"] = False

Base.metadata.create_all(bind=engine)
Creating blueprints
In building this app we will be creating routes in different files other than our run.py file, for this reason, we have to create blueprints for our routes and register them in the run.py file. To create our blueprint let’s first create a folder called routes in our “app” folder. We will then navigate to the routes folder and create two files namely, postRoute.py for our posts routes and userRoute.py for our user routes.
Now we can go ahead and create our blueprints.
In the userRoute.py file, we’ll add the following lines of codes to create our user blueprint.
from flask import Blueprint

user_bl = Blueprint('user', __name__)
In the postRoute.py file, we’ll add the following lines of codes to create our post blueprint
from flask import Blueprint

post_bl = Blueprint('post', __name__)
We now have two blueprints; user_bl and post_bl
The next step is to register these blueprints in the run.py file as follows:
from app.routes.userRoute import user_bl
from app.routes.postRoute import post_bl

app.register_blueprint(user_bl)
app.register_blueprint(post_bl)
Our blueprints are now ready and we can go ahead and start developing our routes. The Routes are the URLs of the application that perform specific functions. In the next step, we will be developing various routes that will constitute the functionalities of the application
Post Routes
Here we shall create all the routes which have to do with a post, get all posts, get a single post by id, get all posts by user/author, add a post, edit a post and delete a post.
Our first route will be to get all posts and display them on the home page. The home page will have a column that displays all the posts with the most recent post at the top and a sidebar that displays the top five most viewed posts. This same sidebar can be used to search for a post by username or post title. To do this, we will need to import a few things and add some lines of codes to our postRoute.py
from flask import flash, render_template, request, redirect, url_for, Blueprint, current_app
from app.main.models.post import Post
from app.main.models.user import User
from app.main.db import session


@post_bl.route('/home', methods=['GET', 'POST'])
def get_all_posts():

    posts = session.query(Post).order_by(Post.date_updated.desc()).all()

    trend_post = session.query(Post).order_by(Post.no_of_views.desc()).limit(5).all()

    if request.method == 'GET':
        if posts:
            return render_template('index.html', posts=posts, trend=trend_post)
        return render_template('index.html')

    elif request.method == 'POST':
        search_criteria = request.form.get('search')
        search_for = request.form.get('search_post')


        search = "%{}%".format(search_for)

        if search:
            if search_criteria == 'search_title':
                result = session.query(Post).filter(Post.title.ilike(search)).order_by(Post.date_updated.desc()).all()


            else:

                result = session.query(Post).filter(Post.username.ilike(search)).order_by(Post.date_updated.desc()).all()

            if result:
                return render_template('index.html', posts=posts, result=result)

            flash('No post found')
            return render_template('index.html', posts=posts)

        return render_template('index.html', posts=posts)

    return render_template('index.html')
Our home route (/home) performs the get_all_posts function and directs us to the home page (index.html) when called. We first get all the posts from the database by querying the Post class in our post.py file and ordering it by date update in descending order since we want the latest post to be on top. For this reason, we need to import it as in the code above. We also get all the posts that have been viewed the most and limit them to five stored in the variable trend_post.
If the request made to the server is a GET method, we want to display all the posts on the home page and the top five viewed posts as well by rendering the index.html template and passing our variables posts and trend_post if there are any, else we just want to render the "index.html" page without passing any variable. This takes us to another concept in Flask "templates"
Adding template files
Flask uses render_template to display HTML files and jinja2 to add python variables to HTML files. For your app to make use of the HTML files, you need to add a folder to your working directorate and name it templates, this is where flask will look at any time we want to render an HTML. The next thing will be to add a file called index.html in your templates folder
<!DOCTYPE html>
<html lang="en">
<head>
    <meta charset="UTF-8">
    <meta http-equiv="X-UA-Compatible" content="IE=edge">
    <meta name="viewport" content="width=device-width, initial-scale=1.0">
    <title>Awesome Blog</title>
</head>

<body class="">
<div class="home-box">

  <div class="blog-container">
    {% if posts %}
    {% for post in posts %}
    <div class="blog-card">

        <div class="blog-img">
          <img class="card-img" src=""
        </div>
        <div>
          <p>Written by: <a href="{{url_for('post.get_post_by_user', username=post.username)}}">{{post.username}}</a></p>
          <h5 >{{post.title}}</h5>
          <p>{{post.content[0:300]}}<span>...</span></p>
          <p >{{post.date_updated.strftime("%a, %b %d %Y")}} at {{post.date_updated.strftime("%I:%M %p")}}</span></p>
          <div>
            <a href="{{url_for('post.read_count', post_id=post.id)}}">
             <button>Read more</button>
             </a>
            <p>No. of views: {{post.no_of_views}}</span></p>
          </div>
        </div>
    </div>

    {%endfor%}

    {%else%}
    <div class="no_post">
      <p><span>Hi,</span><br>
         Welcome To The World of Awesomeness. <br> THERE ARE NO POSTS HERE YET
      <br>Create Some Magic Here by letting The World Know What You Have To Say <br>
      <a href="{{url_for('post.post')}}"><span >Create a Post Here</span></a>
      </p>
    </div>
    {%endif%}
    </body>
</html>
What we are doing in the above code is displaying all the posts we got from our get_all_posts function else we will display a welcome message to the user. You can read more about flask render_template and Jinja here since I won’t be talking much about the front end
Add Post
To be able to add a post, we’ll first create a separate file from our route for adding a post. Let’s do this by adding a folder called “services” in our “main” folder, we then create a file called “postservices.py” in our services folder. The next thing is to add these lines of code to our postservices.py file.
from app.main.models.post import Post
from datetime import datetime
from app.main.db import session

class post_service():

    def create_post(self, title: str, content: str, username: str, image: str):

        if image=='':
            post = Post(title=title, content=content, username=username)

        else:
            post = Post(title=title, content=content, username=username, image=image)

        session.add(post)
        session.commit()
Now we can go ahead and add our route for adding posts as follows. We have to import the post_service class we defined above so we can use it in our routes, also since we are adding images to our post we have to make sure our file is secured by importing secure_filename. You can learn more about adding images to your post here
from app.main.services.postservices import post_service
from werkzeug.utils import secure_filename
from flask_login import login_required
import uuid
import os


@post_bl.post('/post/<username>')
@login_required
def add_post(username):

    title = request.form.get('title')
    content = request.form.get('content')
    image = request.files['image']
    image_name = secure_filename(image.filename)


    if image:

        if allowed_file(image_name) != True:
            flash('Your image should be of the following extensions: jpg, png, jpeg')
            return render_template('post.html', title=title, content=content, image=image_name)
        else:
            image_name = str(uuid.uuid4().time_low) + image_name
            image.save(os.path.join(current_app.config["UPLOAD_FOLDER"], image_name))


    new_post = post_service()
    new_post.create_post(title, content, username, image_name)


    return redirect(url_for('post.home'))
From the above codes, we get the post title, content and image from an HTML form, then we add them to our database by passing them as arguments to our post_service class we imported (new_post.create_post). We then redirect the user to the home page after the post is added. We are also using a login_required decorator to make sure only logged-in users can create a post
Get post by id
To get a single post by the post id, we simply have to pass the id to our URL as follows:
@post_bl.get('/post/<int:post_id>')
def get_post_by_id(post_id):

    post = session.query(Post).filter_by(id=post_id)

    return render_template('postupdate.html', post=post)
Getting posts by id is important if we need to update or even delete a post. From the code above, we need the post to populate in the postupdate.html form so we can edit it
Edit Post
To edit a post, let’s add it to our postservices.py file before we create the route for it. Add these lines of codes to your postservices.py in the post_service class
def update_post(self, post_title: str, post_content: str, post_id: int, image: str):
        post_to_update = session.query(Post).get(post_id)

        if image != '':
            post_to_update.image = image

        post_to_update.title = post_title
        post_to_update.content = post_content
        post_to_update.date_updated = datetime.utcnow()

        session.commit()
This service will take the arguments passed to it and update the post in our database.
Now let’s add these codes to our postRoute.py file for editing the post
from flask import flash, render_template, request, redirect, url_for, Blueprint

@post_bl.route('/post/update/<int:post_id>', methods=['GET', 'POST'])
@login_required
def edit_post(post_id):
    post = session.query(Post).get(post_id)

    if request.method == 'POST':
        title = request.form.get('title')
        content = request.form.get('content')
        image = request.files['image']
        image_name = secure_filename(image.filename)

        if image:

            if allowed_file(image_name) != True:
                flash('Your image should be of the following extensions: jpg, png, jpeg')
                return redirect(url_for('.get_post_by_id', post_id=post.id))
            else:

                image_name = str(uuid.uuid4().time_low) + image_name
                image.save(os.path.join(current_app.config["UPLOAD_FOLDER"], image_name))

        updated_post = post_service()
        updated_post.update_post(title, content, post_id, image_name)


        return redirect(url_for('.get_post_by_user', username=post.username))


    return redirect(url_for('.edit_post', post_id=post_id))
Delete Post
Again let’s add the delete post function in our postservices.py file to delete a post from the database as follows. This should also be under our post_services class
def delete_post(self, post_id: int):
        post_to_delete = session.query(Post).get(post_id)

        session.delete(post_to_delete)
        session.commit()
Here we get the post we want to delete by its id and then delete it from the database
Now we can go back to our postRoutes.py file to create our delete post route as follows
@post_bl.get('/post/delete/<int:post_id>')
@login_required
def delete_post(post_id):
    post = session.query(Post).get(post_id)
    post_to_delete = post_service()
    post_to_delete.delete_post(post_id)

    return redirect(url_for('.get_post_by_user', username=post.username))
Here we pass the id of the post we wish to delete to our post_service by calling the delete_post function to delete it from the database as we defined in the post_services class earlier. We then return the user to the profile. Once again a user needs to be logged in before they can delete a post
User Routes:
We can now start with our user routes. For our user routes, we will be creating routes to add or signup a new user, sign in a user and sign out a user. Because we want the username, and email of our users to be unique, let's add a function to check and ensure this. First, let’s add a new folder called “auth” in our “main” folder then add a file called “userauth.py” in the auth folder. After that, we’ll go ahead and add the following lines of codes to our userauth.py file
from werkzeug.security import check_password_hash
from app.main.models.user import User
from app.main.db import session

class signup_auth():

        def check_email(self, email: str):

            email_exits = session.query(User).filter_by(email=email).first()

            if email_exits:
                return True

        def check_password(self, password: str, confirm_password: str):
                if password == confirm_password:
                    return True

                return False

        def check_username(self, username: str):

            username_exits = session.query(User).filter_by(username=username).first()

            if username_exits:
                return True


class login_auth():

        def confirm_user(self, email: str, password: str):

            user = session.query(User).filter_by(email=email).first()
            return user and check_password_hash(user.password_hash, password)
In our signup_auth class, we have three functions; check_email which checks if a given email already exists in the database by querying the User class or table, and the check_username function which checks if a given username is already in the database. These will help to avoid multiple users having the same username and email.
The login_auth class on the other hand will be used to verify the user email and password when logging in using the confirm_user function. The check_password_hash function is used because we will be storing the password hash in the database and not the original password provided by the user
Add user
Now let’s go ahead and create our first route to create or signup a user by adding these codes to our userRoute.py file
from flask import flash, render_template, request, redirect, url_for, Blueprint, current_app
from werkzeug.security import generate_password_hash
from app.main.models.user import User
from app.main.auth.userauth import login_auth, signup_auth
from app.main.services.userservices import user_service
from app.main.db import session


@user_bl.post('/signup')
def create_user():

    first_name = request.form.get('first_name')
    last_name = request.form.get('last_name')
    username = request.form.get('username')
    email = request.form.get('email')
    password = request.form.get('password')
    confirm_password = request.form.get('confirm')

    user_auth = signup_auth()

    if user_auth.check_email(email) is not True:
        if user_auth.check_username(username) is not True:
            if user_auth.check_password(password, confirm_password) == True:
                if len(password) > 5 :
                    password_hash = generate_password_hash(password, 'sha256', 16)

                    new_user = User(first_name=first_name, username=username, last_name=last_name, email=email, password_hash=password_hash)
                    session.add(new_user)
                    session.commit()

                    return redirect(url_for('user.login'))

                flash('Your password should have more the 5 characters')
                return render_template("signup.html", first_name=first_name, last_name=last_name,
                                    username=username, email=email, password=password, confirm=confirm_password)

            flash('Passwords do not match')
            return render_template("signup.html", first_name=first_name, last_name=last_name,
                                username=username, email=email, password=password, confirm=confirm_password)

        flash('Username already exits')
        return render_template("signup.html", first_name=first_name, last_name=last_name,
                            username=username, email=email, password=password, confirm=confirm_password)

    flash('Email already exits')
    return render_template("signup.html", first_name=first_name, last_name=last_name,
                        username=username, email=email, password=password, confirm=confirm_password)
After getting the necessary information from the HTML form, we first create an instance of the signup_auth class which we use to check if the email provided already exists in the database, we then go ahead to check if the username provided by the user also exists in our database. We also check if the two passwords provided by the user match and if it is more than five in length. If the information provided by the user passes all these checks, we then generate a password hash for the user which will be stored in the database for security reasons and then add the new user to the database with the provided form information using session.add and session.commit. The user is then redirected to the sign-in page after they have signed up. Else we flash different messages to the user depending on the check that failed.
Sign in user
To be able to log in user in Flask, we need to import some libraries and add a few codes to our run.py file. But first, we have to install Flask login to be able to use the necessary libraries. Enter the following in your terminal to install Flask Login.
pip install Flask-Login
Flask-Login is now installed, so let’s go to our run.py file and add the following
from flask_login import LoginManager
from app.main.models.user import User

app.config["SECRET_KEY"] = 'ANY_SECRET_KEY'

login_manager = LoginManager(app)

@login_manager.user_loader
def user_loader(id):
    return session.query(User).get(id)
We need to configure our app with a secret key (This should be any strong secret key). We’ll configure our .flaskenv file as well with the secret key by adding one line of code to the file as follows
SECRET_KEY = 'ANY_SECRET_KEY'
Now we can go back to our userRoute.py file and add these codes to log in a user
from flask_login import login_user, logout_user

@user_bl.post('/login/')
def signin_user():

    email = request.form.get('email')
    password = request.form.get('password')
    user = session.query(User).filter_by(email=email).first()

    user_auth = login_auth()

    if user_auth.confirm_user(email, password) is True:
        login_user(user)
        return redirect(url_for('post.home'))

    flash('Your credentials do not match')
    return render_template('signin.html', email=email, password=password)
We sign in the user with email and password. First, we get the user from our user table using the email provided, we then create an instance of the login_auth class which will be used to confirm the email and password provided by the user. If the information provided matches we can go ahead and log in the user using login_user(user), else we flash an error message to the user that their credentials do not match.
Update/Edit user details
To update a user, let’s first create a separate class that will be used to handle all methods regarding updating a user. Let’s create a file in our services folder called “userservices.py” and add these lines of code to it.
from app.main.models.user import User
from werkzeug.security import generate_password_hash, check_password_hash
from app.main.db import session

class user_service():

    def update_user(self, username: str, fname: str, lname: str, new_username: str, email: str, display_pic: str, background_pic: str):

        user_to_update = session.query(User).filter_by(username=username).first()

        if display_pic != '':
            user_to_update.display_pic = display_pic
        if background_pic != '':
            user_to_update.background_pic = background_pic

        user_to_update.first_name = fname
        user_to_update.last_name = lname
        user_to_update.username = new_username
        user_to_update.email = email

        session.commit()

    def update_password(self, username: str, old_password: str, new_password: str):

        user_to_update = session.query(User).filter_by(username=username).first()

        if user_to_update and check_password_hash(user_to_update.password_hash, old_password):
            new_password_hash = generate_password_hash(new_password, 'sha256', 16)

            user_to_update.password_hash = new_password_hash

            session.commit()

            return True

        return False
The update_user method will be used to update user information including adding of profile and or background picture for the user's profile page. Whiles the update_password method will be used to change a user password. This is done by first checking the password hash of the old password to confirm if it is correct before it is amended with a new password
We can now go to our userRoute.py file to add our route for updating a user. The codes will be used to update user details
@user_bl.post('/profile/update/<username>')
def update_user(username):

    first_name = request.form.get('first_name')
    last_name = request.form.get('last_name')
    new_username = request.form.get('username')
    email = request.form.get('email')
    display_pic = request.files['display_pic']
    background_pic = request.files['background_pic']

    display_pic_name = secure_filename(display_pic.filename)
    background_pic_name = secure_filename(background_pic.filename)


    if display_pic:
        if allowed_file(display_pic_name) != True:
            flash('Your file should be of the following extension: jpg, png, jpeg')
            return render_template('userupdate.html')
        else:
            display_pic_name = str(uuid.uuid4().time_low) + display_pic_name
            display_pic.save(os.path.join(current_app.config["UPLOAD_FOLDER"], display_pic_name))

    if background_pic:
        if allowed_file(background_pic_name) != True:
            flash('Your file should be of the following extension: jpg, png, jpeg')
            return render_template('userupdate.html')
        else:
            background_pic_name = str(uuid.uuid4().time_low) + background_pic_name
            background_pic.save(os.path.join(current_app.config["UPLOAD_FOLDER"], background_pic_name))


    user_to_update = user_service()
    user_to_update.update_user(username, first_name, last_name, new_username, email, display_pic_name, background_pic_name)


    return redirect(url_for('post.update_post_username', username=username, new_username=new_username))
From the codes above, we pass in the username as a variable in our route so that we can use it to filter out the user that needs to be updated. After getting the information from the "update HTML" form, we create an instance of the user_service class and then update the user details using the update_user method by passing in all the information from the form that needs to be updated. We then redirect our URL to a post URL (post.update_post_username) by passing in the old username and new username, this URL will change the username of all the posts of a user if the username has been changed. To do this, let’s add this line of codes to our postRoute.py file
@post_bl.get('/<username>/<new_username>')
@login_required
def update_post_username(username, new_username):

    user_posts = session.query(Post).filter_by(username=username).all()

    if user_posts:
        for post in user_posts:
            post.username = new_username

        session.commit()
        return redirect(url_for('.get_post_by_user', username=new_username))

    return redirect(url_for('.get_post_by_user', username=new_username))
In the code above, we first get all the posts by a particular user using the old username by passing it in our URL and querying our Post class to get user_posts. If we get the user's post we then update all the usernames of the posts with the new username and redirect the user to the profile page by passing in the new username, else we just return the user to the profile page. If the user does not update his or her username, the old username name is treated as the new username, hence there will not be any changes
Logout user
Logging out a user in Flask is very simple. To logout a user we only need to add a few lines of codes to our userRoute.py file as follows
@user_bl.get('/logout')
def logout():
    logout_user()
    return redirect(url_for('post.home'))
The above code logs a user out and redirects the user to the home page
Run the application
After adding all our necessary routes we will have to run the application locally to test what we have done. To run our flask application, we’ll need to go to our terminal and type the following
flask run
Your terminal should display the following if your app runs successfully
* Serving Flask app 'run'
* Debug mode: on
WARNING: This is a development server. Do not use it in a production deployment. Use a production WSGI server instead.
 * Running on http://127.0.0.1:5000
Press CTRL+C to quit
 * Restarting with stat
 * Debugger is active!
 * Debugger PIN: 142-054-875
The above shows that our app is running on our local server on port 5000 and is in debug mode. You can now go ahead and enter the URL http://127.0.0.1:5000 in any browser to view your application. You should not have any errors if all your codes are working well
Final look
Now let’s take a look at how our app should come out.
Note: I used tailwind CSS to beautify my app and since I did not write about the HTML and CSS, your application will look different from mine with regards to the front end
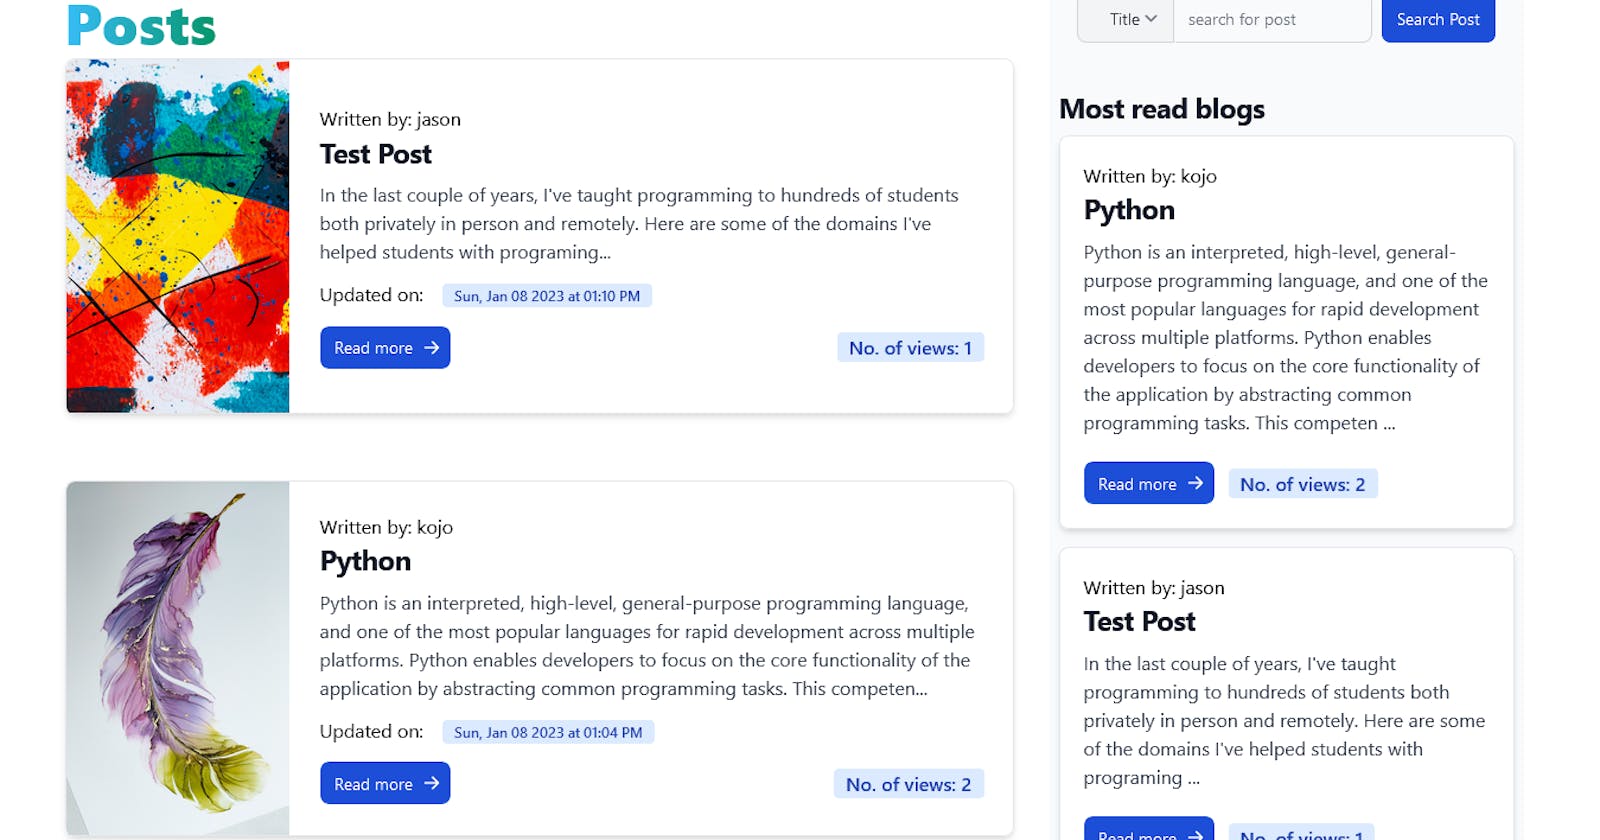
Homepage (User not logged in)

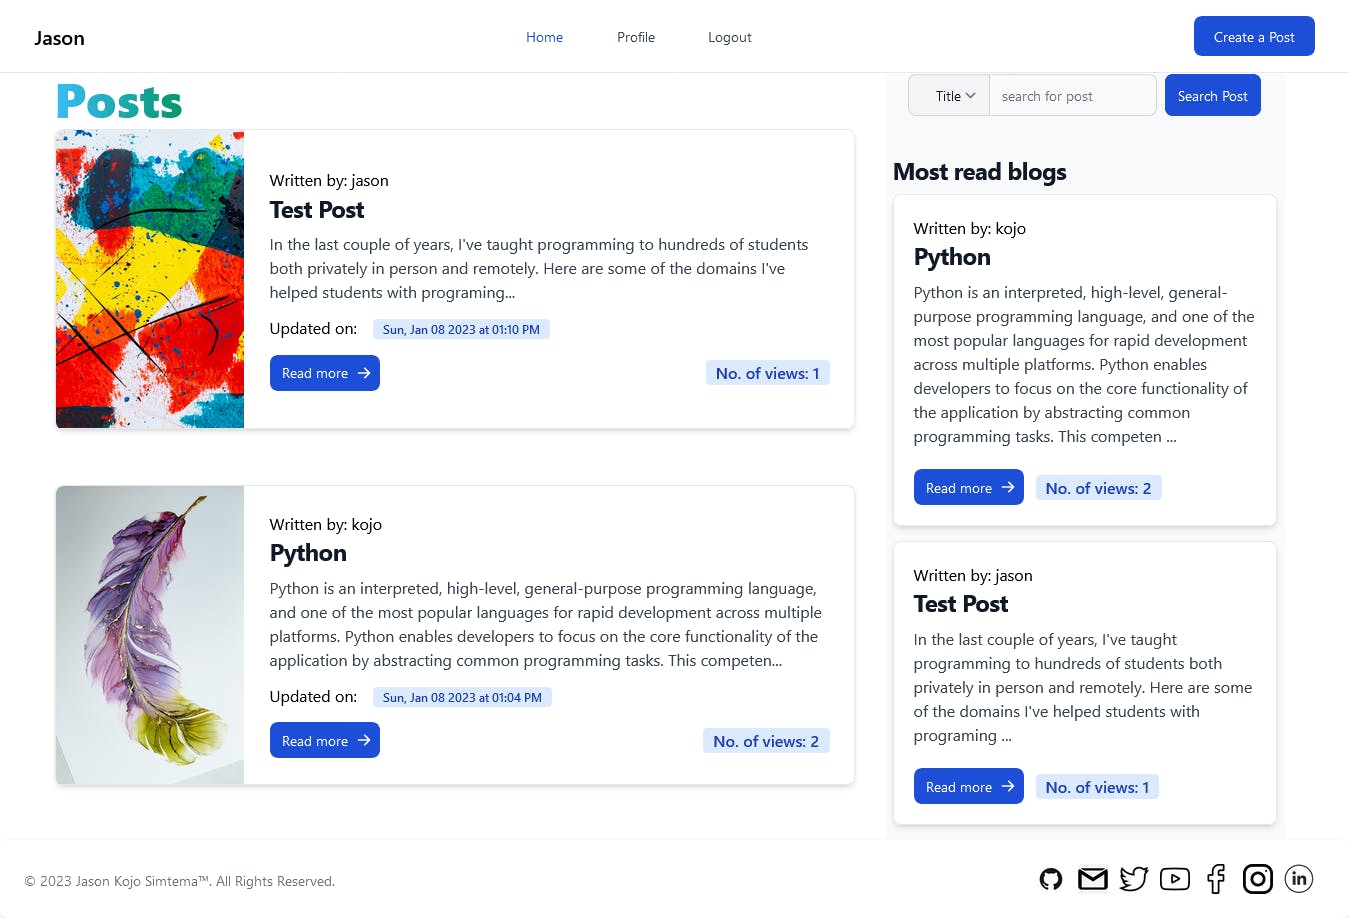
Homepage (User Logged in)
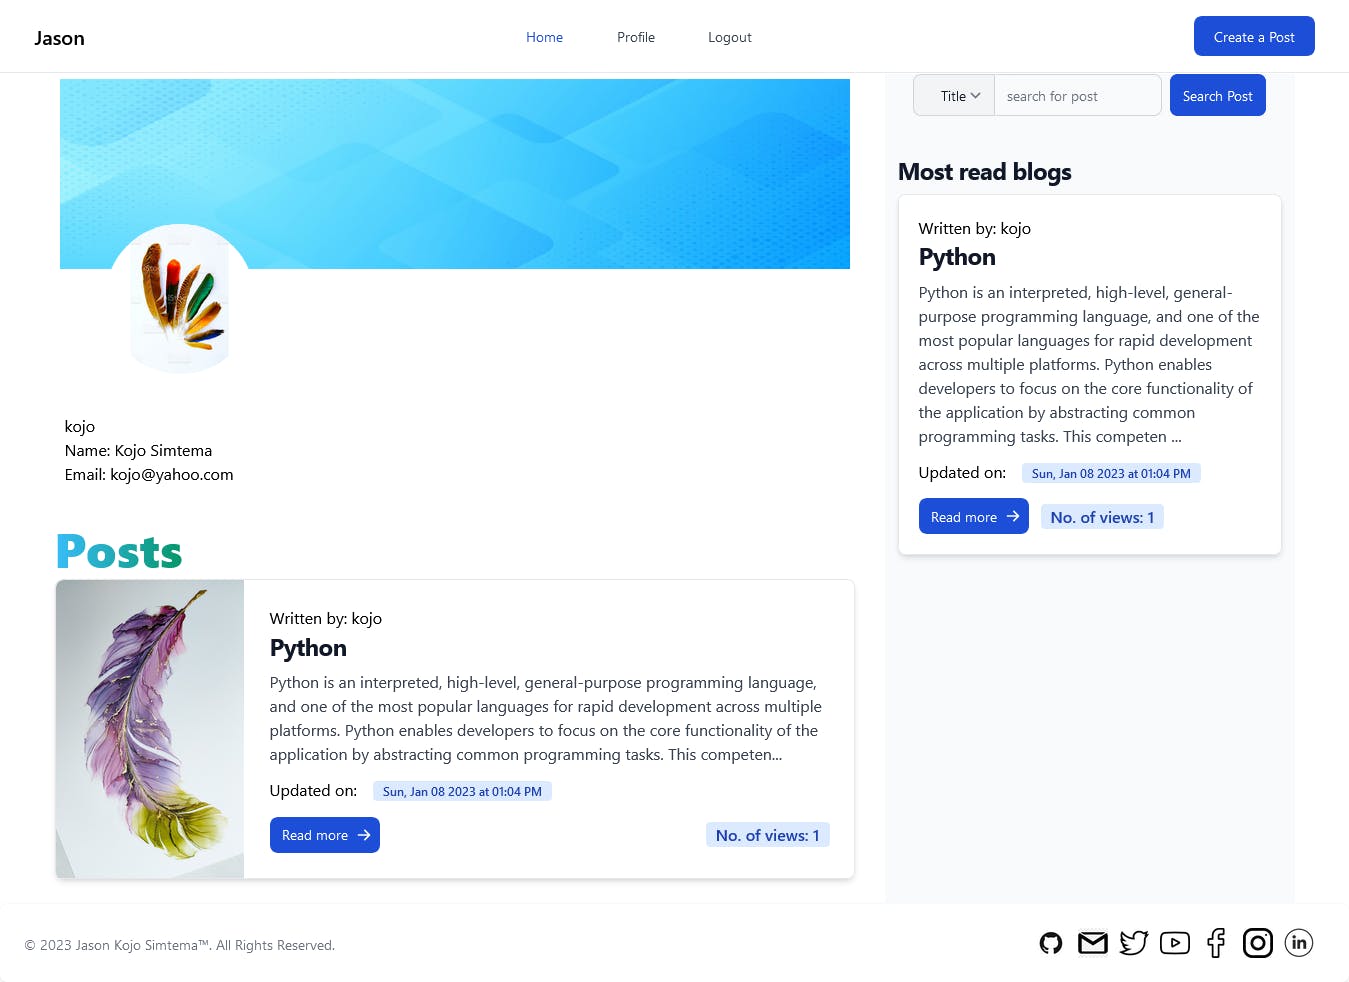
Viewing profile of other users
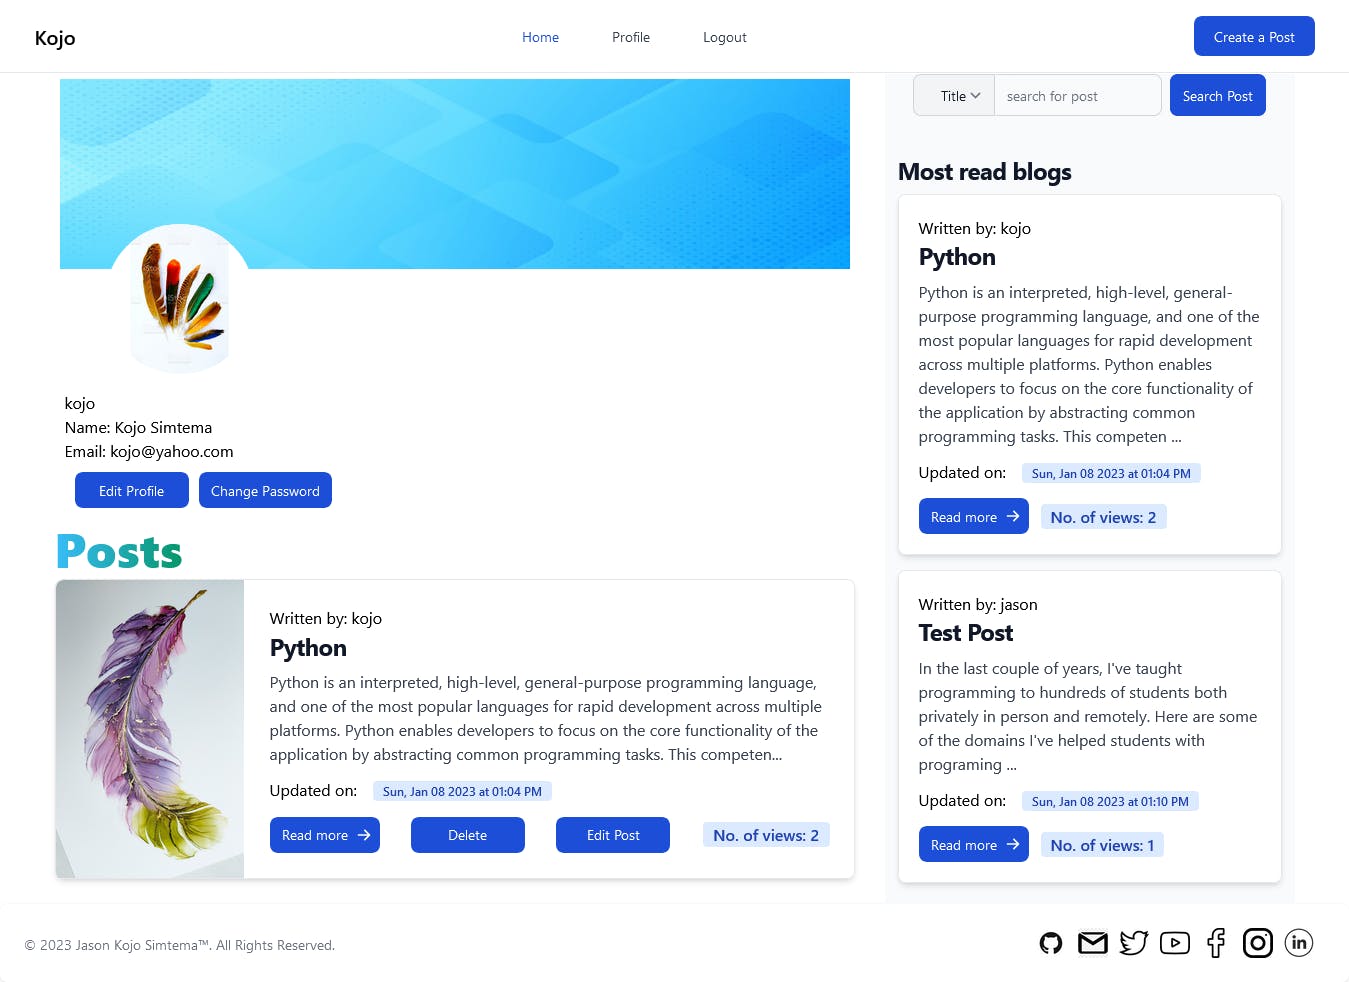
Profile of logged-in user
CONCLUSION
In building this blog application, we have been able to perform CRUD operations on our posts. It was a great experience and task building this application from start to finish. This was made possible through my study at AltSchool Africa, you will be able to build applications like this and more if you pursue a course in software engineering at AltSchool Africa. You can as well take a look at some of the courses they provide here.